Sunday, 11 May 2014
Lifts 2
Posted at 12:00 pm
0 comments (+)
Lifts 1
Back from a dye job! The result is not what I expected, but it's definitely one that I'm starting to like and ~embrace~. Previously, I had 7.) Platinum Roots, Ash-Blonde-Light Orange Hair. Uhm. You might get weirded-out with the names I decide on, but I'm just describing what I see on my hair and I don't really have the knowledge to classify them into shades or hues or whatever. Like I said before, I'm not a professional. Going back, I couldn't take another bleaching session after my hair became gummy and expired pasta. Also, my roots are a level lighter than the rest of my hair, which is pretty strange for people to see (no one in the family took my hair positively after seeing it bleached, lol.) So I bought a Light Ash Blonde Dye in the beauty supply store in hopes of achieving an even hair color and to tone the brassy orange. I was so nervous while my best friend was applying it (there were some horror stories of hair turning pale green after rinsing it out.) Reji assured me that it's not gonna turn green and I took comfort on that. However, when the dye was slowly covering my hair, it had a weed-green tone to it so I (internally) freaked. Left the dye on my hair for an hour and a half, and when we rinsed it....
Goodbye, orange tone and hello, Ash Blonde! But look, there's an odd color that came out after the rinse...
Because I had Platinum roots when I dyed it with Light Ash Blonde, for some reason the Platinum became Gray. COOL BEANS. I know sporting Gray hair would be interesting, but I didn't expect it to happen. It looked so good that I threw out my dream of becoming Platinum and wanted Gray hair, lol! It's not the gray you see in aged people. More of like, silver (so maybe I should've said Silver instead of Gray? lol ok.) BUT IT WAS TOO PRETTY.
8.) Silver/Gray Roots, Ash Blonde Hair
AGGGH, LOVE. At first it was frustrating because only the roots were gray. I wanted the entire head, but it cannot be unless I tone and tone and tone and dye.
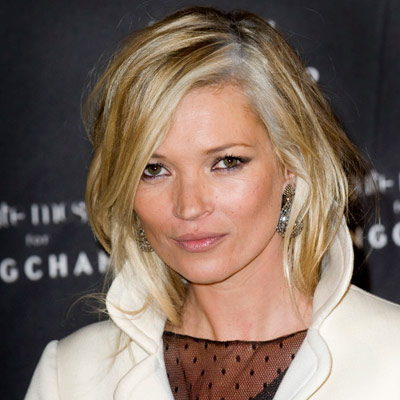
Just gonna leave this Kate Moss photo because we have the same hair, ~squeeeee~ though I think she's fixed hers now. Who knew!
Unfortunately, this gray hair wouldn't last for long. AH, FUCK. I decided that the better decision to do is to (still), even out my color then proceed to the Gray/Silver hair. Just now I toned my hair with my homemade toner, this time to remove the brassy yellow hues. I didn't apply it on my silver roots because the result would be white. After leaving the toner for 4 hours (it'll depend on how brassy your yellow is) and rinsing it, my hair was lighter (almost in level with the roots), but it had a weed-green-blue tone! It's like I went back to my previous ash-blonde stage... A few hours of drying and it became Blonde. Yay!

Emote.
So now, my hair is blonde and the silver/gray roots turned platinum when I rinsed my entire head. It's a lot less awkward to look at now that it's a bit evened-out. I'm considering this another successful step and now I would like to take a break from the processing and just deep-condition my hair. Next time, I'm ordering a toner to effectively lighten my hair to platinum and who knows, maybe I'll proceed straight to silver and another goal in life is completed... So there! Another long post about ~hair~ lol. Girls.
Feel free to address your concerns and I shall entertain them. Good luck! Labels: Hair
Saturday, 10 May 2014
(DIY) Hair Toner for Brassy Yellow and/or Orange Tones
Posted at 11:26 pm
12 comments (+)
Are you Filipino? Are you frustrated with the fact that hair toners are not available for purchase in beauty stores nationwide? No purple hair dye to start with toning? Do you want a cheaper alternative to these toners? Ta-daaaa! Lucky you. Today, I'm sharing a DIY hair toner that's more nourishing to apply on hair. This is what I did when I bleached my hair and the result was Orange, and this is what I also did when I achieved the Blonde. First, I'm going to tell you that you may/may not do this project, since it will always be your choice to take risks or play by the expert's rules. I'm not a hair expert, I'm just in the process of self-renewal wherein I ~share~ stuff that's happening in my life lately with people online, basically strangers.
Here are the things you need to apply on your hair. They're not much and they cost less than the toners and dyes ordered online because Philippines. Online. Sigh. Get my point?
1. White Conditioner: White and only white. I don't know an expert's reason why, but non-white conditioners when mixed with the blue or the purple will, obviously, result into a different color, and we only need purple or blue to happen! Stop making any other fetch happen.
2. Purple Food Color: When you get rid of the orange tones in your hair, mix the conditioner with the purple food color. For your information and curiosity, Violet cancels out Yellow. It neutralizes the brassy yellow color so your hair becomes a nice shade of blonde. The more expensive version of this is mixing the conditioner with a semi-permanent purple hair dye. I guess it's more effective that way, but if you're on a budget then this is an option to go for. Some people would mix the conditioner with 2 drops of purple and 1 drop of blue for parts of the hair that seem to appear yellow-orange.
3. Blue Food Color: Bleaching dark hair to a light blonde is extremely damaging, and once your hair gets to that light orange stage I would suggest you to stop bleaching your hair and proceed to toning (then again, it's up to you!) Before you put on that purple mixture you must get rid of the orange tones first, so you need the conditioner + blue food color mixture. Blue cancels out the Orange, neutralizing the hair and turns it to a yellow-ish color.
Procedure:
- Mix white conditioner and 1-2 drops of food color (Purple if you have more yellow tones, Blue if more orange tones.) on a plastic bowl.
- Apply it on your dry hair.
- It's ideal to leave it it for 15-30 minutes. It depends on how yellow or how orange your hair is; Leave it longer if it's too brassy and rinse it immediately if it's not. Cover it up for faster development.
- Rinse and towel dry.
You should notice your hair getting a level lighter and toned (duh). If you think the procedure was successful and would like to go lighter, then you can do it again, but don't leave it longer than before. If it didn't, you can stop. Check your hair every now and then because leaving the mixture longer than it should be might turn out too green/blue. I advise you to perform a strand-test, even though it's heartbreaking for me to cut pieces of hair.
That's it! Hope this helped. If you have questions, ask me. I'm going to bed with my sister now, just sharing. Good luck and I hope everything works out fine!
Labels: Hair
(DIY) Removing Dye From Hair
Posted at 3:48 pm
0 comments (+)
LOL. I'm here to share the homemade experiment I did to lift the jet black dye I had months ago. Before you proceed, let me tell you that this DIY project did not work on my hair. However, I had super black hair when I did this, so maybe I was just too impatient to see the results and based on my ex-ten-sive research, this works better when you have a lighter hair color than black. Another thing is that there are other methods faster and more effective like using products specifically for hair dye removing, but what I'm gonna show you are safer and milder to use, because duh. Homemade.
It's not much. Basically what you do is to mix any (or both) of these to a SHAMPOO and apply it to your hair. 50-50. They say Anti-Dandruff shampoos would work better, but it's up to you! I didn't include it in the picture because I turned all my shampoos into Purple Shampoos, lol.
1. Baking Soda: I'm kinda taking back what I said about "safer" because Baking Soda + Shampoo makes the hair a wee bit dry. The good thing is it won's smell bad at all and lathering it on hair will make no difference.
2. (Crushed) Vitamin C tablets: They also say that crushed tablets work better than powder, but it's up to you! It always is, lol. If I were to choose the best DIY hair dye lifter, it would be this one. Vitamin C + Shampoo might work on you, though it will smell odd while lathering the mixture on your hair. It's like putting egg yolks, but better.
Of course, this won't remove the hair color in one application. I think doing this every day is fine. By then, you'd notice your hair go from shades of black to red to brown to orange under sunlight, and if you decide to do this for the rest of your life, it might even turn you into a blondie! If the hair dye is completely removed, this can also be a hair-lightening method. Don't forget to apply conditioner after you shampoo. CONDITIONER IS A MUST. ON everything. On most.hair.things. Ok
And there you have it. If you decide to try this DIY job and it worked, then good for you! Keep doing it. If not, then you might have to try the ~other~ methods I was talking about earlier (g-O-o-g-L-E it!) If you have questions, I will do my best-even Google it too if you're lazy to do it- to answer your questions and worries, as I am not really a professional hair-person (just hair-obsessed.) Until then, good luck!
Labels: Hair
Friday, 9 May 2014
Lifts
Posted at 1:38 pm
0 comments (+)
It's been months after my last post that I don't even know how to start this so I'll get straight to the point: I'M GOING BLONDE, MINNA-SAN.
But first, my hair history! Because I have no consistency in life and my preferences shift from time to time, and because I got tired of seeing red/orange/brown tones on EVERY girl's hair on the streets, I decided to go Jet Black. LOL, IKR. Not really the best first step to my sudden blonde ambition. I even did the dye job myself and got stained all over the back of neck and my arms (+++ I WAS GOING TO SCHOOL AND IT WAS SUCH A HASSLE HIDING EVERYTHING SO LOL). Don't dye hair by yourself if you're too chicken to do it. It's not the first time I had my hair colored. Previous ones were Golden Brown then I went with Light Brown, then Dark Brown. All were salon-treated which meant I stashed a lot of cash for it (but NEVER AGAIN.)
1. Jet Black Hair
Fast forward to approx. 8 months and my hair was still the blackest of black. (Turns out, Kolours is a permanent hair-color huhu) School was also over and I have 4 months of vacation! WHAT TO DO?! At that time, my obsession from cosmetics shifted to skincare then body care then hair care to hair colors to blonde hair! See, I can't stick to one thing.
After extensive (and I mean EX-TEN-SIVE) research, I had a diy experiment to lift the black dye from my hair and it was an epic fail because it didn't really do anything when I checked my hair under sunlight.
I did another EX-TEN-SIVE research, this time on Hair Bleaching and gathered my weapons. Because I was a noob and was super panicking, I didn't let it stay that long so the result was a Very Dark Brown hair color which turns Blood Red-Black under sunlight. No photo, sorry. Though it meant progress in my bleach job, I should've left it for an hour or so to get..... this....
2. Dark to Medium Brown Hair (with Orange streaks, yuck)

Gaaahh! It's working. I was too happy to care for my slowly-getting-damaged-hair! After bleaching, it was drier than my dry hair that I had to put it in braids or updos whenever I get out, or even when at home. Also, this is not the beautiful brown you see in box dyes, nope. This one turns a bit orange under sunlight and there were streaks of orange too. A lot of people advised to wait for weeks or months to get another bleach job, but I was just too impatient to get it a level lighter. On my next bleach, I went to my best friend to let her apply it because it was so hard bleaching hair on your own. Again, don't do the bleaching if you're too chicken to do it.
Bleaching at my best friend's went a lot harsher. The bleached stayed for an hour+, my scalp felt like burning, and I could feel the heat happening inside my shower cap, lol. When we rinsed it, my hair felt like spaghetti and it took an hour or so for it to dry. But that's not all! My roots turned Yellow (like, 2 inches of it) and the rest was Dark Orange. WHOA.
3. Yellow Roots, Dark Orange Hair
Ok don't laugh
HAHAHAHA. Ok, I laughed. But as you can see I took it positively; event went out more with my friends sporting this reversed-ombre-kuno-mess-of-a-hair lol and I still put it in braids and updos to lessen the awkwardness of it. Did I mention that it was damaged as ever? #WHATSNEW
4. Platinum Roots, Orange Hair
Still the same (good) shit, but lighter hair color. Sawry, *Jun Ji Hyun voice* the photo might show a brown-ish/gold-ish tone but it's really just a bright orange color. My yellow roots turned Platinum Blonde now and YES, SPAGHETTI HAIR WITH 2 HOURS DRYING TIME... AND I MEAN FAN-DRY. #NothingNew
I'm posting my 5th bleach job, which I didn't even know was the fifth until I started typing "5th" here, lol. To me it felt like my 9th bleach job, and coming and going to my best friend's place was tiring and I feel bad about it. My best friend bleached her hair a long time ago too so she knows this shit. I'm just really glad she's willing to help me achieve this senseless endeavor lol. (Reji-appreciation part) by this time, some of my hair started to fall of and was too damaged to carry on. My hair at the backest part started turning platinum too. Drying it was worse.
5. Platinum Roots, Light Orange Hair

Driiiiiiiiiiiiiie. How lifeless this hair has turned to.
6. Platinum Roots, Light Orange-Yellow Color, Shorter Hair
Look at that wet pasta hair. By this time, my hair went a lighter yellow orange level. I could still bear it, but most of you might fret over the texture and feel of the hair after numerous bleaching. Yes, this really happens. The only way to ~save~ your super bleached hair is to deep-condition it. I also decided to cut my ends because they're super dead. The result was, still, platinum roots. But my orange hair became a light orange color with tints of yellow... BUT LAWRD, MY HAIR. IT'S EXPIRED-SPAGHETTI-BAD. I was getting tired of the orange tones in my hair so I researched on how to remove the orange tones. Finally, I settled on a homemade experiment and this came to be...
7. Platinum Roots, Ash-Blonde-Light Orange Hair
Whew! IT'S TOO PRETTY. The toner did the job last night, I tell ya. But because I had limited amount of toner I wasn't able to cover it completely, so this photo only shows the parts that were covered. I still have tints of orange hair and platinum roots, and my hair is.as.pasta.dead.as.e.v.e..r.r.r.r.r. I don't even comb my hair anymore huhu. There are also green streaks in my hair because I accidentally covered some of my platinum back roots with the toner, but I'm fine with it.
So that's how far I am now! Actually, I think I'm still 2-3 stages away from achieving Platinum, according to what I've researched. I'm going back to my best friend's place later to dye my hair Light Ash Blonde. Err, I'm pretty nervous about this. I've heard horror stories of hair turning green when they covered bleached hair with Ash Blonde. But anyway, I'll post the result as soon as I can. Feels good to be back in blogging (aka talking to myself online). I have lots of things to share so you can all copy me loljk. Hope this helped/inspired/entertained/annoyed you!
Labels: Hair
|

About
20, Manila, 97% seated
|